kubesectips v1
Security tips for Kubernetes
- Part 1 - Architecture
- Part 2 - Vulnerabilities
- Part 3 - Hardening
Comming soon Kubernetes Pod PrivEsc…
PART 1 - ARCHITECTURE
What does Kubernetes do?
- Allows running container/s in a container engine.
- Schedule allows containers mission efficient.
- Keep containers alive.
- Allows container communications.
- Allows deployment techniques.
- Handle volumes of information.
Architecture:
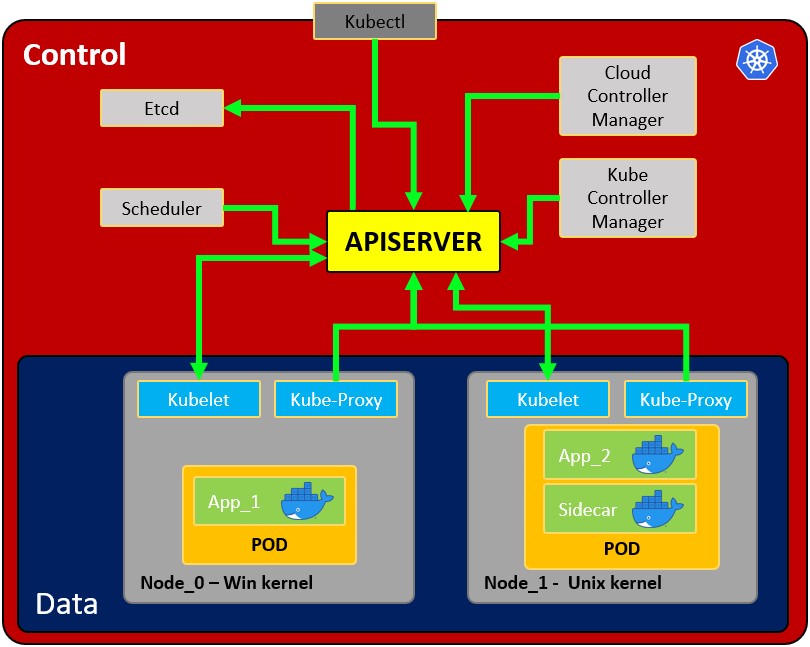
- Node: operating system with pod or pods.
- Pod: Wrapper around a container or multiple containers and it contains an app.
- Kubelet: Primary node agent. The component that establishes communication between node and kubectl, and only can run pods (through API server). The kubelet doesn’t manage containers that were not created by Kubernetes.
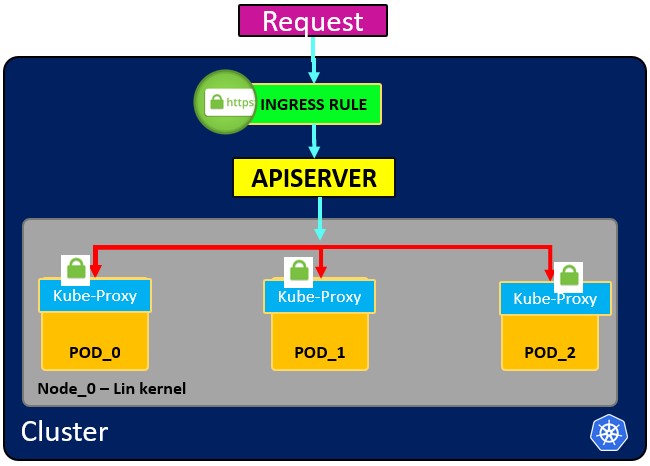
- Kube-proxy: is the service in charge of the communications (services) between the apiserver and the node. The base is an IPtables for nodes. Most experienced users could install other kube-proxies from other vendors.
- Sidecar container: Sidecar containers are the containers that should run along with the main container in the pod. This sidecar pattern extends and enhances the functionality of current containers without changing them. Nowadays, We know that we use container technology to wrap all the dependencies for the application to run anywhere. A container does only one thing and does that thing very well.
- Kubectl: Kubernetes’s CLI, allows you to manage and deploy containers. You can inspect the cluster’s resources. Communications with API server
- Scheduler: Scheduling refers to making sure that Pods are matched to Nodes so that Kubelet can run them Watches for new Pods that have no Node assigned. This component assign pods with nodes.
- etcd: Data storage, persistent, consistent, and distributed. Is Kubernetes’s database and the key-value storage where it keeps the complete state of the clusters.
- Kube Controller manager: check several resources, for example, the replica sets or the deployments to check if, for example, we have the correct number of pods or nodes running. It controls replication, tokens, and account services to the API.
- Cloud controller manager: Is the specific controller for flow controls and applications, i.e: if you have clusters in AWS or OpenStack.
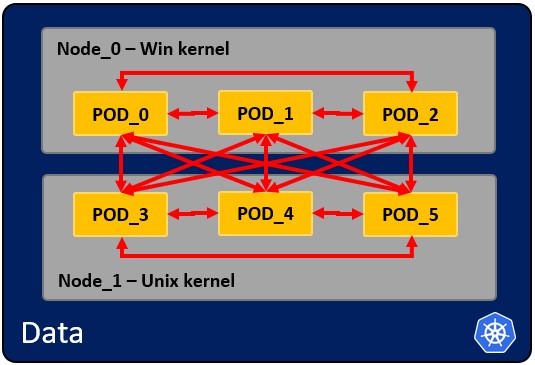
How pods communicate with each other.
PKI infrastructure - Certificate Authority CA:
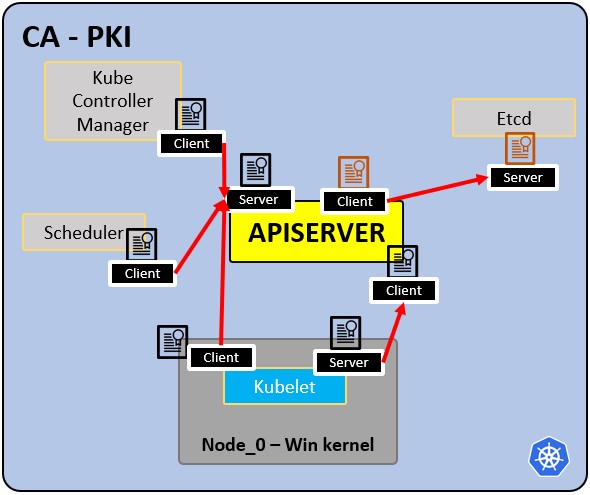
- CA is the trusted root for all certificates inside the cluster.
- Allows components to validate to each other.
- All cluster certificates are signed by the CA.
- ETCd has its own certificate.
- types:
- apiserver cert.
- kubelet cert.
- scheduler cert.
PART 2 - VULNERABILITIES and some fixes.
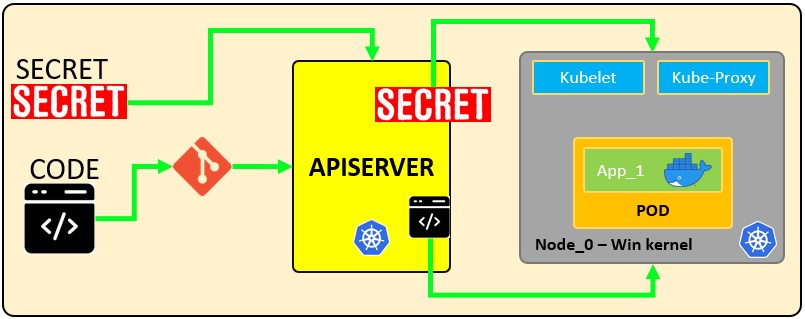
Vulnerabilities - kubernetes secrets
A Secret is an object that contains a small amount of sensitive data such as a password, a token or a key. Such information might otherwise be put in a Pod specification or in an image. Users can create Secrets and the system also creates some Secrets. The name of a Secret object must be a valid DNS subdomain name.
Secrets can be things like:
- API, SSH Keys.
- OAuth tokens.
- Credentials, Passwords (plain text or b64 + encryption).
- Information or comments.
- Database connection code, strings… .
Secret types:
| Builtin Type | Usage |
|---|---|
| Opaque | arbitrary user-defined data |
| kubernetes.io/service-account-token | service account token |
| kubernetes.io/dockercfg | serialized ~/.dockercfg file |
| kubernetes.io/dockerconfigjson | serialized ~/.docker/config.json file |
| kubernetes.io/basic-auth | credentials for basic authentication |
| kubernetes.io/ssh-auth | credentials for SSH authentication |
| kubernetes.io/tls | data for a TLS client or server |
| bootstrap.kubernetes.io/token | bootstrap token data |
How secrets works:
 https://kubernetes.io/docs/concepts/configuration/secret/#using-secrets-as-files-from-a-pod
Create a secret, commands:
kubectl create secret generic secret_01 --from-literal user=<user>
kubectl create secret generic secret_01 --from-literal password=<password>
kubectl run pod --image=nginx -oyaml --dry-run=client
kubectl run pod --image=nginx -oyaml --dry-run=client > <podName.yaml>
This is the generated file:
apiVersion: v1
kind: Pod
metadata:
  name: mypod
spec:
  containers:
  - name: mypod
    image: redis
    volumeMounts:
    - name: <secret_01>
      mountPath: "/etc/<secret_01>"
      readOnly: true
  volumes:
  - name: <secret_01>
    secret:
      secretName: <secret_01>
      items:
      - key: username
        path: my-group/my-username
Using Secrets as environment variables
If you want to use a secret in an environment variable to allow the rest of the pods to reference the same secret, you could use:
In the
#apiVersion: v1
#kind: Pod
#metadata:
#  name: secret-env-pod
#spec:
#  containers:
#  - name: mycontainer
#    image: redis
    env:
      - name: SECRET_USERNAME
        valueFrom:
          secretKeyRef:
            name: mysecret
            key: username
#     - name: SECRET_PASSWORD
#        valueFrom:
#          secretKeyRef:
#            name: mysecret
#            key: password
#  restartPolicy: Never
The result is:
apiVersion: v1
kind: Pod
metadata:
  name: mypod
spec:
  containers:
  - name: mypod
    image: redis
    env:
      - name: PASSWORD
        valueFrom:
          secretKeyRef:
            name: <secret_02>
            key: <password>
    volumeMounts:
    - name: <secret_01>
      mountPath: "/etc/<secret_01>"
      readOnly: true
  volumes:
  - name: <secret_01>
    secret:
      secretName: <secret_01>
      items:
      - key: username
        path: my-group/my-username
Save and:
kubectl -f <podName.yaml> delete --force
kubectl -f <podName.yaml> create
or:
kubectl -f <podName.yaml> replace --force
More info: https://kubernetes.io/docs/concepts/configuration/secret/#using-secrets-as-environment-variables
Discover secrets in docker:
To get the id of the container.
docker ps | grep <service>
Inspect:
docker inspect <docker_id>
Check env (environment variable section) for secrets and you will see:
- Passwords.
- Ip’s.
- Ports.
- Paths.
- Others… .
If you want to copy:
docker cp <docket_id>:/etc/<secret_01> <secret_01>
Discover secrets in etcd:
Remember that etcd is a consistent and highly-available key-value store used as Kubernetes backing store for all cluster data. Let’s access to the secret in etcd:
cat /etc/kubernetes/manifests/kube-apiserver.yaml | grep etcd
You will see certs, keys and url’s were are located in the FS. Once you get it, you would be able to connect to etcd.
ETCDCTL_API=3 etcdctl --cert <path to client.crt> --key <path to client.ket> --cacert <path to CA.cert> endpoint=[<ip:port>] health
i.e:
ETCDCTL_API=3 etcdctl --cert /etc/kubernetes/pki/apiserver-etcd-client.crt --key /etc/kubernetes/pki/apiserver-etcd-client.key --cacert /etc/kubernetes/pki/etcd/etcd/ca.cert endpoint=[127.0.0.1:1234] health
Once you achieve establish communication you would be able to get the secrets:
ETCDCTL_API=3 etcdctl --cert <path to client.crt> --key <path to client.ket> --cacert <path to CA.cert> endpoint=[<ip:port>] get <path/to/secret>
i.e:
ETCDCTL_API=3 etcdctl --cert /etc/kubernetes/pki/apiserver-etcd-client.crt --key /etc/kubernetes/pki/apiserver-etcd-client.key --cacert /etc/kubernetes/pki/etcd/etcd/ca.cert endpoint=[127.0.0.1:1234] get /registry/secrets/default/secret_02
Adding encryption to the ETCD
So, by default all the secrets are in plain text unless you apply an encryption layer: If the identity provider is empty with the default value = {} so the secrets are in plain text. https://kubernetes.io/docs/tasks/administer-cluster/encrypt-data/
Encryption types
| Name | Encryption | Strength | Speed | Key Length | Other Considerations | |-|-|-|-|-|-| | identity | None | N/A | N/A | N/A | Resources written as-is without encryption. When set as the first provider, the resource will be decrypted as new values are written. | | aescbc | AES-CBC with PKCS#7 padding | Strongest | Fast | 32-byte | The recommended choice for encryption at rest but may be slightly slower than secretbox. | | secretbox | XSalsa20 and Poly1305 | Strong | Faster | 32-byte | A newer standard and may not be considered acceptable in environments that require high levels of review. | | aesgcm | AES-GCM with random nonce | Must be rotated every 200k writes | Fastest | 16, 24, or 32-byte | Is not recommended for use except when an automated key rotation scheme is implemented. | | kms | Uses envelope encryption scheme: Data is encrypted by data encryption keys (DEKs) using AES-CBC with PKCS#7 padding, DEKs are encrypted by key encryption keys (KEKs) according to configuration in Key Management Service (KMS) | Strongest | Fast | 32-bytes | The recommended choice for using a third party tool for key management. Simplifies key rotation, with a new DEK generated for each encryption, and KEK rotation controlled by the user. |
The secrets will be encrypted with the above algorithms and encoded by base64.
kubectl get secrets --all-namespaces -o json | kubectl replace -f -
How to encrypt the ETCD
Create a directory in /etc/kubernetes ; in this case you will name it as etcd, so you have:
/etc/kubernetes/etcd
You create a yaml file with the configuration.
vi <configFile.yaml>
You can copy the content of https://kubernetes.io/docs/tasks/administer-cluster/encrypt-data/
apiVersion: apiserver.config.k8s.io/v1
kind: EncryptionConfiguration
resources:
  - resources:
    - secrets
    providers:
    - aescbc:
        keys:
        - name: key1
          secret: <your pass in b64>
    - identity: {}
Generate pass in b64 (remember to use a pass character with lenght = 16 or = 24 or = 32) :
echo -n <password> | base64
You can see how the encryption provider is not setting.
After that, you have to edit the file /etc/kubernetes/manifest/kube-apiserver.yaml and add the following lines into the sections: And add the following line: spec:
  containers:
  - command:
    - kube-apiserver
    - --encriyption-provider-config=/etc/kubernetes/etcd/<configFile.yaml>
Scroll down in the volumeMounts:
- mountPath: /etc/kubernetes/etcd
    name: etcd
    readOnly: true
Scroll down in the volumeMounts to hostPath:
- hostPath:
    path: /etc/kubernetes/etcd
    type: DirectoryOrCreate
  name: etcd
Get information about the secrets.
kubectl get secret
kubectl get secret <secret_name> -oyaml
ETCDCTL_API=3 etcdctl get /registry/secrets/default/secret1 [...] | hexdump -C
kubectl create secret generic test-secret --from-literal='username=my-app' --from-literal='password=45tRf$we34rR'
With root access:
# kubectl get secret
kubectl get secret test-secret -oyaml
Do not forget to delete de secrets and re-create them again in order to apply the encryption layer.
Final tips:
- Try not to keep secrets in the FS, get them from other places.
- Check out https://www.vaultproject.io/ for add more protection to your secrets.
- https://kubernetes.io/docs/concepts/configuration/secret/#risks
- https://docs.cyberark.com/Product-Doc/OnlineHelp/AAM-DAP/11.2/en/Content/Integrations/Kubernetes_deployApplicationsConjur-k8s-Secrets.htm
Vulnerabilities - Container runtime sandboxes
How an attack with lateral movement and privesc could be done:

Getting inside the container:
kubectl get node
kubectl run pod --image=<image_name>
kubectl exec pod -it -- bash
Once inside the container:
root@pod01:/# uname -r
If you want to gather information you could use:
strace uname -r
ltrace uname -r
When the attack achieves discovering the kernel version, he could run exploiting techniques to gather information or escalate into the OS.
For secure sandboxes:
- gVisor:
https://github.com/google/gvisor
- Katakontainers:
Vulnerabilities - OS
Is mandatory to keep in mind to define privilege and access control for container / pod:
- userID’s and groupID’s.
- Privileged or unprivileged escalation runs.
- Linux.
More info at: https://kubernetes.io/docs/tasks/configure-pod-container/security-context/
userID and groupID
# kubectl run pod --image=busybox --command -oyaml --dry-run=client > <podName.yaml> -- sh -c 'sleep 1h'
# vi <podName>.yaml
Add the uncomment lines:
#apiVersion: v1
#kind: Pod
#metadata:
#  name: security-context-demo
spec:
  securityContext:
    runAsUser: 1000
    runAsGroup: 3000
    fsGroup: 2000
#  volumes:
#  - name: sec-ctx-vol
#    emptyDir: {}
#  containers:
#  - name: sec-ctx-demo
#    image: busybox
#    command: [ "sh", "-c", "sleep 1h" ]
   securityContext:
    runAsNonRoot: true
#    volumeMounts:
#    - name: sec-ctx-vol
#      mountPath: /data/demo
#    securityContext:
#      allowPrivilegeEscalation: true
Save and:
# kubectl -f <podName>.yaml delete --force
# kubectl -f <podName>.yaml create
Check permissions:
# kubectl exec -it <podName> -- sh
How to disable privilege escalation:
vi <podName>.yaml
Set this line to false
allowPrivilegeEscalation: false
Save and:
kubectl -f <podName>.yaml delete --force
kubectl -f <podName>.yaml create
Modify PodSecurityPolicy
Pod security policies control the security policies about how a pod has to run. More info at: https://kubernetes.io/docs/concepts/policy/pod-security-policy/
Edit the kube-apiserver.yaml file:
vi /etc/kubernetes/manifests/kube-apiserver.yaml
Inside you add in
- --enable-admission-plugins=NodeRestriction,PodSecurityPolicy
Vulnerabilities - mTLS
Mutual authentication, two-way, pod to pod.
More info at: https://kubernetes.io/docs/tasks/configure-pod-container/security-context/
Create a sidecar proxy app
Create your
kubectl run app --image=bash --comand -oyaml --dry-run=client > <appName.yaml> -- shj -c 'ping google.com'
Edit your
#apiVersion: v1
#kind: Pod
#metadata:
#  name: security-context-demo
#spec:
#  securityContext:
#    runAsUser: 1000
#    runAsGroup: 3000
#    fsGroup: 2000
#  volumes:
#  - name: sec-ctx-vol
#    emptyDir: {}
#  containers:
#  - name: sec-ctx-demo
#    image: busybox
    command: [ "sh", "-c", "apt update && apt install iptables -y && iptables -L && sleep 1h" ]
    securityContext:
      capabilities:
        add: ["NET_ADMIN"]
 #   volumeMounts:
 #   - name: sec-ctx-vol
 #     mountPath: /data/demo
 #   securityContext:
 #     allowPrivilegeEscalation: true
See the logs of the proxy:
kubectl logs app -C proxy
More info at: https://kubernetes.io/docs/tasks/configure-pod-container/security-context/
PART 3 - HARDENING.
3.1 CLUSTER HARDENING - RBAC
https://kubernetes.io/docs/reference/access-authn-authz/rbac/ RBAC = Role-based access control (RBAC) is a method of regulating access to a computer or network resources based on the roles of individual users within your organization. RBAC authorization uses the rbac.authorization.k8s.io API group to drive authorization decisions, allowing you to dynamically configure policies through the Kubernetes API
To enable RBAC, start the API server with the –authorization-mode flag set to a comma-separated list that includes RBAC; for example:
kube-apiserver --authorization-mode=Example,RBAC --other-options --more-options
This is enabled by default. RBAC functions:
- Restrict the access to the resources to users or ServiceAccounts.
- An RBAC Role or ClusterRole contains rules that represent a set of permissions.
- Permissions are purely additive (there are no “deny” rules).
- RBAC works with Roles and Bindings
The principle of Least Privilege is the meaning of only access to data or information when is necessary for a legitimate purpose.
Types of resources:
https://kubernetes.io/docs/concepts/overview/working-with-objects/namespaces/
Concept of namespaces:
Kubernetes supports multiple virtual clusters backed by the same physical cluster. These virtual clusters are called namespaces. These are intended for use in environments with many users spread across multiple teams, or projects. For clusters with a few to tens of users, you should not need to create or think about namespaces at all. Start using namespaces when you need the features they provide.
Namespaces provide a scope for names. Names of resources need to be unique within a namespace, but not across namespaces. Namespaces cannot be nested inside one another and each Kubernetes resource can only be in one namespace.
Viewing namespaces:
You can list the current namespaces in a cluster using:
kubectl get namespace
NAME              STATUS   AGE
default           Active   1d
kube-node-lease   Active   1d
kube-public       Active   1d
kube-system       Active   1d
Setting the namespace preference
You can permanently save the namespace for all subsequent kubectl commands in that context.
kubectl config set-context --current --namespace=<insert-namespace-name-here>
Not All Objects are in a Namespace. Most Kubernetes resources (e.g. pods, services, replication controllers, and others) are in some namespaces. However, namespace resources are not themselves in a namespace. And low-level resources, such as nodes and persistentVolumes, are not in any namespace.
To see which Kubernetes resources are and aren’t in a namespace:
In a namespace
kubectl api-resources --namespaced=true
Not in a namespace
kubectl api-resources --namespaced=false
Difference between Role and ClusterRole:
Role:
RBAC allows setting different permissions for the same role with the independence of the namespace. Roles example:
/api/v1/namespaces/{namespace}/pods/{name}/log

apiVersion: rbac.authorization.k8s.io/v1
kind: Role
metadata:
  namespace: defaultGreen
  name: pod-and-pod-logs-reader
rules:
- apiGroups: [""]
  resources: ["pods", "pods/log"]
  verbs: ["get", "list", "watch"]
Other example, same Role different nameSpace and permissions:
apiVersion: rbac.authorization.k8s.io/v1
kind: Role
metadata:
  namespace: defaultYellow
  name: pod-and-pod-logs-reader
rules:
- apiGroups: [""]
  resources: ["pods", "pods/log"]
  verbs: ["watch"]
ClusterRole:
A ClusterRole can be used to grant the same permissions as a Role. Because ClusterRoles are cluster-scoped, you can also use them to grant access to:
- cluster-scoped resources (like nodes).
- non-resource endpoints (like /healthz).
- namespaced resources (like Pods), across all namespaces.
For example you can use a ClusterRole to allow a particular user to run:
kubectl get pods --all-namespaces
ClusterRole example:
apiVersion: rbac.authorization.k8s.io/v1
kind: ClusterRole
metadata:
  # "namespace" omitted since ClusterRoles are not namespaced
  name: secret-reader
rules:
- apiGroups: [""]
  #
  # at the HTTP level, the name of the resource for accessing Secret
  # objects is "secrets"
  resources: ["secrets"]
  verbs: ["get", "watch", "list"]
Role and ClusterRole Binding concept:
A role binding grants the permissions defined in a role to a user or set of users. It holds a list of subjects (users, groups, or service accounts), and a reference to the role being granted. A RoleBinding grants permissions within a specific namespace whereas a ClusterRoleBinding grants that access cluster-wide.
A RoleBinding may reference any Role in the same namespace. Alternatively, a RoleBinding can reference a ClusterRole and bind that ClusterRole to the namespace of the RoleBinding. If you want to bind a ClusterRole to all the namespaces in your cluster, you use a ClusterRoleBinding.
RoleBinding example:
apiVersion: rbac.authorization.k8s.io/v1
# This role binding allows "jane" to read pods in the "default" namespace.
# You need to already have a Role named "pod-reader" in that namespace.
kind: RoleBinding
metadata:
  name: read-pods
  namespace: default
subjects:
# You can specify more than one "subject"
- kind: User
  name: jane # "name" is case sensitive
  apiGroup: rbac.authorization.k8s.io
roleRef:
  # "roleRef" specifies the binding to a Role / ClusterRole
  kind: Role #this must be Role or ClusterRole
  name: pod-reader # this must match the name of the Role or ClusterRole you wish to bind to
  apiGroup: rbac.authorization.k8s.io
ClusterRoleBinding example:
apiVersion: rbac.authorization.k8s.io/v1
# This cluster role binding allows anyone in the "manager" group to read secrets in any namespace.
kind: ClusterRoleBinding
metadata:
  name: read-secrets-global
subjects:
- kind: Group
  name: manager # Name is case sensitive
  apiGroup: rbac.authorization.k8s.io
roleRef:
  kind: ClusterRole
  name: secret-reader
  apiGroup: rbac.authorization.k8s.io
Permissions are additive so if you have a clusterRole with “list” and “delete” secrets you can add it with a Role with “get”. So be aware and test always your roles and permissions and specify what is ALLOWED, because everything is DENIED.
3.2 SERVICE ACCOUNTS HARDENING
ACCOUNTS
https://kubernetes.io/docs/reference/access-authn-authz/service-accounts-admin/ Users:
- Accounts for “persons” who hold a certificate integrated with the Kubernetes Identity Management of cloud providers.
- There is no Kubernetes user resource.
- A user has a Key and a Cert.
How it works:
Openssl –> CSR (CertificateSigningRequest) –> CertificateSignedRequest –> Kubernetes API <– CA
Be aware of the certificates because there is no way to invalidate them, you have to wait until the expiration date reaches. So what could you do in case you have to restrict the access?
- Create a new CA and reissue all certificates.
- Remove all RBAC access
ServiceAccounts:
- Accounts for “machines”. Is managed by the kubernetes API.
- Namespaced.
- Can interact with the Kubernetes API.
- The “Default” SA is in every namespaced used by the PODS.
3.3 KUBERNETES API HARDENING
API requests are always assigned to a User, ServiceAccount or Anonymous request. After the request must be authenticated. https://kubernetes.io/docs/reference/command-line-tools-reference/kubelet-authentication-authorization/
Request process:
User or K8s ServiceAccount –> Authentication –> Authorization –> Admission Control.
TIPS:
- Close ports.
- Avoid Anonymous access.
- NodeRestriction; No access from specific nodes to the API.
- https://kubernetes.io/docs/reference/access-authn-authz/admission-controllers/#noderestriction
- Basically prevents kubelets from adding/removing/updating labels with a node-restriction.kubernetes.io/ prefix. This label prefix is reserved for administrators to label their Node objects for workload isolation purposes, and kubelets will not be allowed to modify labels with that prefix.
- And also, allows kubelets to add/remove/update these labels and label prefixes.
- Ensure with labels the secure workload isolation.
- Avoid specific pods from API access.
- Avoid ApiServer exposure to the internet.
- Avoid unauthorized access RBAC.
- ApiServer port with firewall and IP whitelisting.
3.4 KUBERNETES CLUSTER HARDENING
Upgrade it frecuently, you will receive:
- Dependencies up to date.
- Bug and security patches.
Release cycles: Each 3 months there is a new minor release https://kubernetes.io/docs/setup/release/version-skew-policy/ 1.20.3 = 1(Major).20(Minor).3(patch)
Best way to update or upgrade a Kubernetes Cluster:
https://kubernetes.io/docs/tasks/administer-cluster/cluster-upgrade/
- Upgrade the Master Node components following this sequence:
- etcd (all instances).
- kube-apiserver (all control plane hosts).
- kube-controller-manager.
- kube-scheduler.
- cloud controller manager, if you use one.
- Upgrade the Worker Node components such as kube-proxy, kubelet.